Death in Family – Matt McEnerney

Those who have visited my site may have noticed a gap in posts.

My handy-man husband was killed by a drunk driver July 4, 2019.

If you want, you can watch a re-cap of some of our better times here:

There have been no more projects to post since that tragic day.

I hope to continue with craft and home-improvement posts once I have relocated.

Thank you for your support.

-Becca

Living Room Update [Inexpensive Gray Laminate Floors & Neutral Walls]

So, I tend to “overlook”, “ignore” or “turn a blind eye” to things in my home that I don’t love/hate, but just don’t have the time/energy/money to fix.
Scratch that – things that someone (hint: husband) doesn’t see a problem with and thinks aren’t worth the money to change.
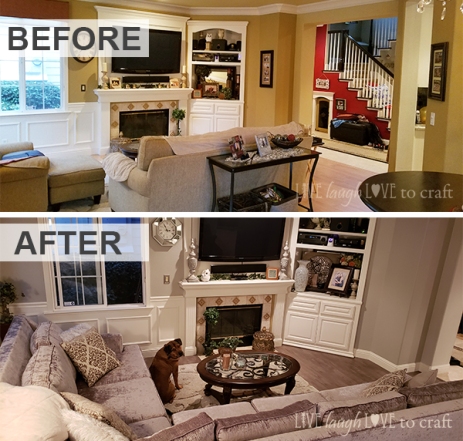
As embarrassing as this is to share, this is how my living room looked for a very, very long time.

living-room-makeover-before-1

living-room-makeover-before-2
I don’t even know where to begin pointing out the issues.
I can say that the color of the floor kind of dictated my choice in furniture & wall color. This was the 3rd wall color. (Proud to announce I now have a 4th color up – a WINNER).
And can we discuss these dying window shades?
living-room-sliding-glass-door-roman-shades-broken
When I moved in, they were already there, but with a fabric I hated. I found the most frugal way to fix the stitch and bought fabric from JoAnn that I just laid over the fabric that was there and (judge not) just pinned onto the old fabric. All that heaviness was wayyyy too much and one of the cords broke. So, they sat like this for eight long years. Like I said….blind eye.
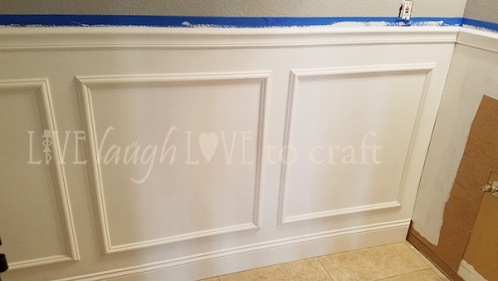
So while we had slowly made some great improvement to the room – this TV mantle upgrade, custom dog door and board and batten mirror wall – it was still a very sad room taking up over 50% of our downstairs.
Womp, womp.
Basically, I wanted a new couch, new flooring, and new wall colors.
But husband was like, “It’s fine the way it is.”
Tripple womp.
Then I strategized a bit and figured out the first step was to put in new floors (then the walls and furniture would no longer match (what?!? didn’t expect that!) and therefore need to be replaced…spoiler alert – my plan worked!).
I started talking about new floors about a year before I got anywhere. Then, I came into some unexpected money and headed straight to the floor store for some samples.
Here’s where things got interesting.
Matt (husband) said – and I quote – “I could care less what color the floors are.” Yet, as soon as samples started to appear in his living room he had quite an opinion, let me tell you. He even started going with me to the floor store to select samples. Wait, what?!
In the end, we each had a different “top pick” but since we was being such a good sport and letting me move forward with this project, I let him have the final say. I also compromised on how much flooring was replaced – I wanted the entire downstairs (there’s also tile) but only replaced the laminate.
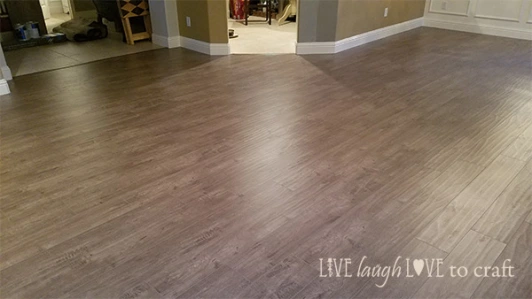
Because we have a dog we decided to replace our laminate with….new laminate! Oh my gosh this stuff was cheap. But it looks ah-maz-ing and even after 8 months, not a scratch or blemish can be found.
This is Patina Design’s Phoenix Mint laminate flooring:
living-room-laminate-flooring-patina-design-pheonix-mint-gray-brown.jpg
living-room-makeover-gray-laminate-floors-patina-design
living-room-new-laminate-floors-phoenix-mint-faux-wood
The floors were installed through a local flooring company, and they did a fantastic job.
Immediately after the floors went in I painted the walls and the ceiling.
living-room-new-floors-new-paint
This is Valspar Signature Frappe in eggshell:
living-room-makeover-lowes-valspar-ashen-gray-paint-on-walls.jpg
The wall color goes perfect with the flooring.
living-room-patina-design-phoenix-laminate-mint-valspar-frappe-gray-walls
I wanted an accent wall, so I painted this wall Valspar Signature Ashen gray (darker than Frappe) but you can’t really tell there’s a difference.
living-room-patina-design-phoenix-laminate-mint-valspar-ashen-gray-walls
The rug and most of the furniture still looked great, but the couch had to go. Not only is the the wrong color, but it’s looks way too small for the space.
living-room-new-floors-old-couch
living-room-remodel-old-couch.jpg
This couch wasn’t new by any means but was in SUPER condition. And I could not sell it to save my life. The consignment store wouldn’t even take it. Snobs! J/K. Ended up donating it which beat throwing it in the dumpster.
As I mentioned before, replacing the couch was on my mind well before the new floors went in. And around Christmas last year we went to a housewarming party and these friends of our had the most amazing couch. So we headed straight to the store they got it from – Sofas 4 Less – to design our new couch.
This store is so cool because you pretty much design your own custom couch. You pick the dimensions, the depth of the cushions, the softness, the fabric….literally every detail.
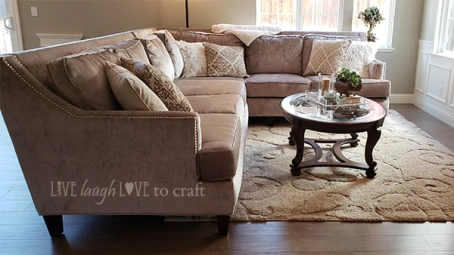
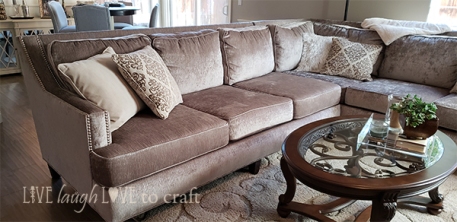
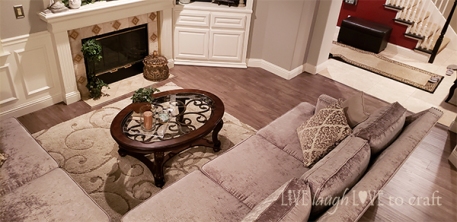
Here’s our new custom Sofas 4 Less couch:
living-room-after-makeover-sofas-4-less-couch-taupe.jpg
taupe-sectional-couch-sofas-for-less-living-room-makeover.jpg
living-room-sofas-for-less-gray-laminate-florring-update-after.jpg
Overall, we’re super happy with the new flooring and color scheme. Orange-ya glad we ditched the old colors? 😉
living-room-laminate-floor-makeover-before-after-live-laugh-love-to-craft.jpg
I was worried a much larger sectional couch would make it feel tight and closed in, but it actually feels much more inviting now.
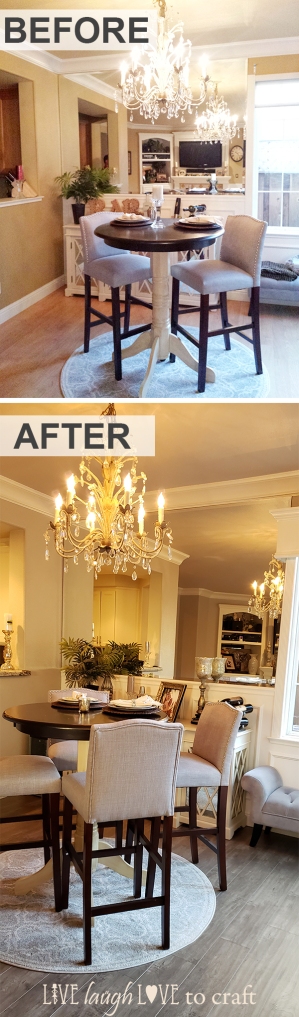
living-room-makeover-renovation-before-after-pics.jpg
I just loved this bar table makeover before we re-did the rest of the room. But with the new floor, it really looks like it was meant for this space.
small-formal-dining-room-bar-table-makeover-gray-laminate-flooring-pheonix-mint.jpg
If you haven’t seen this room before – check out this before bar table makeover when we didn’t have the wainscot or mirror wall addition up yet.
This is how this small formal dining section of the living room looked long, long ago:
blog-wainscot-wall-dining-room-before
It seriously feels so much bigger now!
Hope you enjoyed this before and after living room update with neutral walls, laminate flooring and a nice big sectional sofa.
blog-patina-design-phoenix-mint-laminate-gray-floors.jpg
living-room-laminate-floor-update-frappe-ashen-gray-valspar-walls-before-after.jpg
You may have spotted those custom made white painted wooden window cornices we created – can’t wait to show you how we made those. Stay tuned!

Gray & White Powder Room Makeover with Wainscot Wall

My powder room was in desperate need of a makeover.

In my younger years, I loved this animal print stencil and had created this unfortunate ambiance:

powder-room-before

We referred to this room as “The Jungle.”

The stencil wasn’t bad, but the paint colors were….atrocious.

So, I decided to give this room an upgrade, which included:

  • gray paint (Home Depot’s Behr Sparrow 780F-4U)
  • wainscot wall
  • new hardware
  • new vanity
  • new mirror
  • new rug
  • crown moulding

Oh ohmygosh it is so. much. better!

Here’s the after (and it’s still not done – but more on that later):

powder-room-makeover-gray-walls-wainscot

Read on for the details of this complete powder room transformation.

GRAY PAINT:

This gray paint – Behr “Sparrow” from Home Depot was perfect for this room.

I also painted the ceiling (which I highly recommend always doing in a lighter coordinating color), but the ceiling color came out looking blue, so I plan to redo it.

I only painted 2/3 down, since we planned wainscoting for the bottom. We also removed the pedestal sink.

power-room-makeover-paint-sink

WAINSCOT WALL:

We added the backing for the wainscot wall on each wall..

powder-room-batten-wall-install.jpg

Then added the decorative wainscot boxes and a coat of white paint. We did the same style of wainscot as in our living room, since we love it in there.

powder-room-wainscot-wall

Looking better already! Oh and here’s a sneak peak at the new vanity from Home Depot:

powder-room-wainscotting-wall

NEW SINK VANITY:

I hated the pedestal sink because there was NO storage. I wanted to keep extra toilet paper and cleaning supplies in the room so a new vanity with storage was super important.

I had to keep the budget low, so I didn’t splurge, but I do feel we got a decent piece for what we paid.

We chose the 30″ Vinnova Naples vanity from Home Depot.

powder-room-white-marble-vanity-home-depot-vinnova-naples

A major gripe we had about this piece was that the fixed shelf obstructed the sink pipes, so we had to cut a chunk out of the shelf to install it (see arrow).

powder-room-vanity-cut-room-for-pipe

The granite also had a big scratch, but I didn’t notice right after I purchased it, since we didn’t do the installation right away. A reminder to ALWAYS inspect things you buy as soon as you get them!

The scratch isn’t visible in the pic, but here’s the gray and white marble top. Love it!

powder-room-vinnova-naples-gray-marble-vanity-top

NEW HARDWARE:

I am loving the newbrushed nickel hardware (also from Home Depot). It’s the Moen Hensley towel bar, faucet and toilet paper holder.

powder-room-hardware-upgrade-stainless-steel-brushed

CROWN MOUDLING:

Our ceiling has this odd curve on one wall, which definitely made the crown moulding installation a challenge.

powder-room-crown-moulding-installation.jpg

NEW MIRROR:

I’m not a big fan of things that are round. So, the builder-grade oval mirror just had to go.

The original replacement mirror I got was the perfect size (and sooo cheap!), but it gave off a distorted reflection. Too cheap, I guess.

The second mirror had a good reflection but just wasn’t the right size for the space. Too small.

The THIRD mirror was perfect. And, awesome because it had previously been in my entry way (but no longer had a home), so it didn’t cost a thing. All it needed was a coat of silver glitter spray paint to make it match the room.

Viola!

powder-room-spray-paint-mirror-before-after

powder-room-silver-painted-mirror.jpg

TOUCH OF WHIMSY:

A decorator once told my mom that every room should have a touch of whimsy.

So, while I had the spray paint out for the mirror makeover, I gave this giraffe a makeover too.

powder-room-decor-silver-giraffe-whimsy

It’s the only piece of decor from the “before” that got to stick around.

Here’s the before/after comparison, quite a difference, huh?

powder-room-makeover-gray-white-marble-wainscot.jpg

gray-white-powder-room-marble-vanity-wainscot-wall.jpg

MORE UPDATES TO COME:

The upper section of wall behind the vanity still has to be tiled, and I ultimately plan to wallpaper the walls, so stay tuned!


DIY Unicorn Costume Accessories

Dressing up is one of my favorite things. Which makes Halloween one of my favorite holidays.

When I decided to be a unicorn, it wasn’t long before I was dreaming up ways to make the costume extra special.

And here were the results:

blog-unicorn-costume-horn-ears-hoofs-hooves-led-tail

The accessories I made for this costume include:

  • light-up headband with unicorn horn
  • led unicorn costume tail
  • arm hoofs
  • glitter hoof shoes

Flashing LED Unicorn Horn

In a previous post, I went into detail on how I made my own light up unicorn horn headbandlight-up-unicorn-horn-for-costume-led-diy

Lighted Unicorn Tail

I used the same battery operated color changing LED lights that I put in the horn to create the unicorn tail.

blog-unicorn-costume-led-light-up-tail-diy-how-to.jpg

When I spotted this super cheap, pale blue costume wig, I knew it would make the perfect light-up tail.

blog-unicorn-costume-wig.jpg

I used strong thread to attach the string lights to the wig cap. Then wrapped the cap of the wig onto this updo hair clip that I then safety pinned to the back side of my costume.

blog-unicorn-costume-light-up-tail-supplies.jpg

I got so many compliments on the tail.

blog-unicorn-costume-led-lit-light-up-tail.jpg

Hoof Arm Covers

To create hooves to cover my arms and hands, I got some cheap rubbery horse hoofs (like these here), some spray paint and a little fake fur to line them with.

blog-unicorn-costume-furry-glitter-hoof-arm-covers-supplies.jpg

I used white primer, followed by a couple coats gold spray paint, then gold glitter spray.To finish up, I glued this faux white fur liner from Hobby Lobby to the legs.

blog-unicorn-hoof-gold-glitter-fur-fuzzy-arm-cuff-hand-covers

Hoof Shoes for Unicorn Costume

To create hoof shoes, I covered black high heels with sheets of thick/sturdy glitter scrapbook paper.

blog-unicorn-costume-gold-sparkle-hoof-shoe-with-high-heel

Then, I added these white fuzzy boot cuffs from a Santa costume accessory kit:

blog-unicorn-costume-fuzzy-boot-cuffs.jpg

To add a pop of color, I also wore bright pink leg warmers under the boot cuffs.

blog-unicorn-costume-hoofs-hoof-shoes-diy

Unicorn Hair, Makeup + Face Jewels

I added some pastel hair extensions, purple eye shadow and face jewels to finalize my look:

blog-unicorn-costume-makeup-glitter-jewels-hair.jpg

blog-unicorn-costume-pastel-hair-makeup-jewels-horn-headband

This is by far my favorite costume that I’ve worn yet. I just might wear it again this year.

blog-unicorn-costume-horn-ears-hoofs-hooves-led-tail

DIY Mickey Ears [for a Day at Disney]

Guess who just went to Disneyland for the very. first. time?!

My 33 year-old husband.

Growing up in the Midwest, trips to Disney just didn’t happen in his family.

I was so, so, so excited to get to share the magic of Disneyland with him for the very first time.

So excited that I went a little overboard with trip planning. Right down to ordering 2 custom Disney tanks on Etsy and making my very own mouse ears.

blog-diy-mickey-ears-craft-for-day-at-disney-disneyland-trip-vacation

My favorite thing about crafting Mickey or Minnie ears, is that you can’t mess it up!

Just head to the craft store, find embellishments to dress up your ears, and start gluing. I got these super cheap (and comfy!) plain mouse ears for adults on Amazon. Then, I was off to Hobby Lobby where I found embellishments that coordinated with the color of my custom Etsy tank.

I could hardly wait for my glue gun to heat up. Keep reading to see how easy it was.

Craft Your Own Mickey Ears Headband for Your Disneyland Trip

I wanted lots of flowers and a big blingy sequin bow. So here’s what I got for my custom Mickey ears:

blog-diy-mickey-ears-supplies-for-disney-trip.jpg

First, I attached the sequin bow, which came on a clip. I cut the elastic off this flower band:

blog-mickey-ear-embellishments-craft.jpg

Then clipped the bow to the elastic, wrapped it around the Mickey Ear headband, tied it in a knot, then continued to wrap it around and glued it into place.

blob-mickey-ears-silver-sequin-bow.jpg

blog-mickey-ear-headband-sequin-bow-clip.jpg

Ta-da! That was easy.

blog-mickey-headband-ears-with-blingy-bow-sequins-disney.jpg

Now, I arranged the remaining embellishments on the ears, playing around with them until I liked the look.

blog-mickey-minnie-mouse-ears-craft.jpg

I removed the clip from this ivory flower embellishment so I could just glue it onto my headband.

blog-mickey-ears-bow-clip

blog-mickey-mouse-ears-headband-craft-flowers

One of the silk flower clusters came attached to a felt pad. Another came on a bobby pin. I slid the one on the bobby pin onto the felt pad, then glued the entire cluster to one of the big round ears on my mouse ears headband.

blog-mickey-ear-flower-embellishments-diy-how-to-make.jpg

I used “blonde” ribbon to help disguise the headband in my light hair.

blog-blonde-headband-ribbon.jpg

That’s it! Just a plain mouse ears headband, some floral embellishments, ivory ribbon and a big silver sequin bow.

blog-disneyland-trip-mouse-ears-diy.jpg

I got lots of compliments while wearing them in the park.

blog-custom-mickey-ears-mouse-headband-disneyland.jpg

Light Up Unicorn Horn Tutorial

Unicorn Costume with Light-Up Horn

I’ll be sharing my entire DIY Unicorn costume in another post, but below, I’m showing how I made the best part – the light-up horn.

light-up-unicorn-horn-for-costume-led-diy

Here’s a short video of how it looks in the dark:

Isn’t it magical?!?

DIY Lighted Unicorn Horn Headband Tutorial

Materials:

  • 3 Felt Sheets (1 stiff, 1 soft, 1 “pretty”)
  • Multi-colored LED Lights (I used 2 strands)
  • Glue Gun (or fabric glue)
  • Thread / Needle
  • Ribbon
  • Decorative Trim (I used faux fur)
  • Scissors

I started by rolling this sheet of CPE Stiffened EasyFelt into a cone shape, and cutting off the excess pieces.

blog-unicorn-horn-with-led-battery-lights

Then, I hooked the end of one of the LED light stings to the top of the horn. I rolled the cone shape around the lights, and stuffed the excess light wires into the horn.

Next, I traced the round opening on the bottom onto some of the excess felt, and cut out a piece to close off the bottom (with wings to tuck in and glue to the sides of the cone’s interior).

blog-unicorn-horn-bottom-piece.jpg

I glued the battery packs side by side to the bottom piece, then tucked everything into the cone and glued into place, making sure the ON/OFF switches were still accessible.

blog-led-unicorn-horn-headband-cone-felt.jpg

Next, I covered the cone shape with 2 more pieces of felt – 1 that was really soft and cushy, and one that was a little stiffer with pretty sparkles.

blog-felt-for-unicorn-horn.jpg

blog-unicorn-horn-cut-felt

It’s important to make the inside piece slightly smaller than the outside piece so that the bottom/inside one won’t be exposed once you roll it around the cone (see the arrow below – that’s what you don’t want – I didn’t cut it down enough).

blog-unicorn-headband-horn-creating

Next, use a needle and some strong thread to wrap very tightly around the horn. You want to create indentations with the thread.

I used the needle to secure the thread to the top, wrapped it tightly around the cone, then used the needle again to secure it at the bottom.

blog-wrap-unicorn-horn-tightly-with-strong-thread.jpg

The strongest thread I had on-hand was gray, but if you have white, you may want to use that so it’s less visible.

Next, use your glue gun (or a fabric glue) to carefully cover thread with a pretty ribbon (pulling tightly as you go).

blog-wrap-pretty-gold-ribbon-along-thread-of-unicorn-horn.jpg

Next, you’ll attach your horn to either a hair clip or headband.

I added some gold glitter paper to this kitty cat ears headband from Charlotte Russe (which I already had on hand). Then paired it with a 2nd headband that has white fluffy ears.

I attached the pair of headbands together using a piece of leftover felt, then glued the horn to the felt on the top of the headbands.

blog-headbands-for-felt-unicorn-costume-horn.jpg

Once the horn has been glued to a headband or hair clip, you can dress up the bottom with some trim. I used some faux fur from an old Santa hat.

blog-faux-fur-trim-for-unicorn-horn-craft.jpg

blog-unicorn-costume-headband-glitter-fur-trim-lights-up.jpg

Here is the completed headband with ears and the light-up horn:

blog-led-light-up-unicorn-horn-headband-halloween-costume-accessory.jpg

Want to see the custom glitter hoof shoes, gold unicorn hooves gloves, multi-colored hair extensions and light-up tail? See my DIY unicorn costume accessories post here.

Oktoberfest Party Must-Haves

Last weekend we threw an Oktoberfest themed party and it was our favorite gathering yet!

Here, I’ll share some details that made our Fall party stand out.

German Party Food

We grilled brats and served them with sauerkraut on sourdough buns with a variety of mustards and home-made potato salad.

One of our most popular food items was our soft pretzels dipped in hot cheese sauce.

blog-oktoberfest-party-soft-pretzels-mustard-cheeese.jpg

Straw Hay Bales for Back Yard Seating

We rented some straw bales for guest seating in our back yard. And they were such a hit!

A local feed store rents these out for about $6/bale.

blog-straw-hay-bales-oktoberfest-theme-party-seating.jpg

I had NO idea how messy these were until the gentleman loaded them up in the back of my SUV. Oh, my, goodness! I thought I’d never get all that straw out of my car!

They made an equally huge mess in the back yard (as well as in the house when I lost control and one went flying off the cart I was hauling it through the house with).

But, overall, I’m glad we rented them because they were perfect seating around our Hammerschlagen game.

Oktoberfest Beer

We stocked a variety of Fall flavored and Oktoberfest themed beer – a must for any Oktoberfest celebration.

blog-mini-kegs-german-beer-oktoberfest-party-ideas.jpg

Pretzel Necklaces

I had so much fun making these pretzel necklaces – simply weave some thin ribbon in and out to create a string pretzel necklace for you and your party guests.

blog-oktoberfest-party-pretzel-necklaces

Biergarten Pennant Banner Sign

Even though I strung these blue and white checkered banners across our yard, I also decided to make a custom pennant banner that said “Biergarten”, which added a nice touch to the corner behind the bar.

blog-biergarten-pennant-banner-sign-oktoberfest-diy-party-craft.jpg

Shot Paddle

If you’ve even been to a Hofbrauhaus, you might remember that when someone orders a shot of alcohol, it comes along with a paddling!

My husband took a paddle and created shot glass size divots on one side. When party guests requested shots of Jagermeister, the shot was brought out on a paddle and the guest got a fun little spanking.

blog-shot-paddle.jpg

To add to the fun, we used light-up shot glasses (which we happened to already have leftover from our wedding 6 years ago).

Hammerschlagen Party Game

There’s a fun little German Beer Hall in Milwaukee that has this game called Hammerschlagen. We decided to play this at our party.

The best thing about this game is that anyone can play, and any number of people can crowd around and play each tie, so no one ever has to wait around for their turn to join in.

Every player gets a nail, and you go around in a circle trying to hammer your nail down until it’s flush with the wood. You get one try, then pass the hammer, and on and on until the last person still hasn’t hammered their nail in.

The last person to get their nail all the way in has lost. You decide on what penalty they get for losing. At our party, they could do a paddle shot or a bierstick.

blog-hammerschlagen-nail-german-party-game-drinking.jpg

Just down the street from our house, we noticed a property with lots of tree stumps lying around.

My husband rang the doorbell and asked if he could buy one, and the friendly homeowner let him take one.

blog-fun-german-game-hammerschlagen.jpg

We set up the stump on one of our rented straw bales and it was the perfect height.

blog-hammerschlagen-game-players-get-nail-to-start-oktoberfest-party

Everyone who came to the party played at least once, and most people played again and again.

blog-party-game-hammer-nails-german-hammerschlagen

Oktoberfest Party Attire – Traditional Lederhosen

This was one of our annual “Jean Short Jamboree” parties, so we decided to order denim lederhosen to stick with our jean short theme.

Guests were encouraged to wear both jean shorts and Oktoberfest attire.

blog-lederhosen-bavarian-german-oktoberfest-outfits-attire-costume.jpg

We always let our dog join in on the fun, and we paired her denim shorts with this Oktoberfest vest I picked up while ordering the blue and white checkered decorations.

blog-oktoberfest-lederhosen-costume-for-dog-apron.jpg

I think our makeshift Oktoberfest dog costume came out pretty good!

Bavarian Braids

I completed my outfit with one of my hand-made pretzel necklaces and some Bavarian braids in my hair.

My hair is pretty thin and not as long as I’d like, so I added a couple wefts of Bellami hair extensions and no one could even tell!

blog-bavarian-braids-lederhosen-outfit-oktoberfest.jpg

I usually add mini bows to the ends of my Oktoberfest braids, but since there was ribbon on my top as well as in my pretzel necklace, I decided the bows at the ends of my braids were too much,

Blue & White Checkered Decor

I got blue and white plates, napkins and party cups. And of course, the signature blue and white checkered pattern table runner and matching banners to drape across the back yard.

blog-pretzels-for-fall-party.jpg

And don’t forget the Oktoberfest party music!

blog-throw-the-ultimate-oktoberfest-themed-fall-party-ideas.jpg

Floating Shelf Night Stand for Small Bedroom

In our my parents summer weekend lakeside getaway home, my husband and I share a small bedroom that only has room on 1 side of the bed for a nightstand.

And, it’s not my side of the bed.

I take a sip of water every time I wake up throughout the night. So for years, I’ve spent summer weekends with my water bottle on the floor next to the bed. Right alongside my charging cell phone that I glance at to check the time each time I wake up.

….Which is a lot, since we share this small room with our dog who, while at the lake, isn’t fond of sleeping because ALL she wants to do is go outside and swim in the lake. Regardless of what time it is.

blog-lake-dog-swimming

Since there wasn’t room for a side table to hold my drink and cell phone clock, I decided the solution was a floating shelf.

blog-easy-bedside-table-floating-shelf-for-small-spaces.jpg

This project was *so* easy to make, and it’s already brought me so much happiness!

Here’s how we made our floating bedside phone ledge:

Use wood to create a rectangle frame. Then, create a slightly bigger sleeve that can slide over the frame once it’s mounted to the wall (basically a rectangular box with 1 side missing).

blog-small-floating-shelf-frame-and-sleeve.jpg

blog-floating-ledge-bedside-drink-phone-holder.jpg

Once the sleeve was painted black (to match the bed and wall mirror it is nudged between), we drilled some holes in the frame where it would be screwed into the wall.

blog-tiny-floating-shelf-drill-holes.jpg

Using a laser level to ensure our floating ledge would be straight, we marked and drilled 3 holes in the wall where we planned to install the frame.

blog-floating-night-stand-ledge-drill-wall.jpg

Once we added some anchors, we screwed the shelf into place.

blog-frame-for-floating-shelf-ledge-next-to-bed-small-room

Next, we just slid the sleeve part right over the frame, and ta-da!

blog-simple-bedside-shelf-for-drink-phone-chapstick

It’s the perfect size for the space and has room to hold me 3 night-time essentials: water, Chapstick and my phone.

Nautical Accessories for Bachelorette Party {At the Lake}

I love summertime Bachelorette parties.

blog-bachelorette-party-at-the-lake.jpg

Last summer, when my girlfriends and I hit South Lake Tahoe for our best bud’s Bachelorette weekend, we brought along some fun anchor themed accessories.

Here’s what we used to complete our Nautical Themed Party Weekend:

Anchor Bride & ‘Mate’s Tanks:

I don’t know about you, but I’ve been to so many parties with custom tanks that are specific to the event, and I never wear them again.

blog-anchor-bride-party-tanks-for-beach-bachelorette.jpg

So for our Tahoe weekend, I created a “Bride” anchor tank for the bride, but plain anchor tanks for the rest of the party crew.

I still enjoy wearing my blue and glitter silver anchor tank at the lake.

Customized Nautical Beach Cups:

I got these fun party tumblers on Etsy, and they were a hit. I love how they matched our cute party tanks.

blog-anchor-bridal-party-cups-tumblers.jpg˙

Custom Vodka Bottle for the Bride:

I dressed up this bottle of alcohol by adding an anchor, the Bride’s name, and some scattered vinyl polka dots to a giant Skyy Vodka bottle.

blog-custom-vodka-bottle-cricut-vinyl.jpg

Beachy Framed Weekend Itinerary:

The plans for the weekend were all a surprise for the Bride, so this framed party weekend itinerary was another fun touch.

blog-beach-bachelorette-party-itinerary-frame-decor

I’ll share more of our themed Bachelorette weekends later. But for now, what are some of the best destinations you’ve been to for a weekend with the girls?

blog-lake-anchor-theme-bachelorette-party-weekend-accessories.jpg

Destination Golf Themed Birthday Party

I mentioned in a previous post that my family likes to do destination birthday parties on milestone birthdays.

Last weekend we traveled to Scottsdale, Arizona for a weekend filled with golf festivities to celebrate my step-brother’s 40th birthday.

On the itinerary: TopGolf, a round of golf at Troon North, and a nice dinner at Ruth’s Chris steakhouse.

We got the par-tee started at TopGolf on Friday night and it did not disappoint!

To tee off the fun, we wore silly hats and themed sunglasses and ordered a round of drinks that came in light-up golf bag glasses at the rooftop bar.

blog-golf-hats-glasses-photo-props-for-party

The birthday boy and his girlfriend:

blog-golf-party-hats-glasses-drinks.jpg

After that, we got to hit golf balls off the ledge for 2 hours.

blog-golf-party-topgolf-arizona

We decorated the tables with golf balls and golf tees, a custom glass for the birthday boy, and fun photo props for pictures.

blog-golf-party-topgolf-tees

blog-golf-party-light-up-glass.jpg

blog-golf-party-photo-props

In case you’re wondering how good of a golfer I am:

Hahaha!

The next day we had a nice lunch at Troon North Golf Club, then enjoyed some golf (for the first time for some of us).

Got some more use out of our golf themed photo props on the course:

blog-golf-party-photo-props-golf-course.jpg

(I decided to dress like more of a golfer this day!)

We even hit a few of our customized golf balls:

blog-golf-party-custom-text-golf-balls.jpg

All who attended got goody bags filled with candy wrapper party favor candy bars as a fun takeaway:

blog-party-themed-candy-bar-wrappers.jpg

If you were to take a trip for a destination birthday party, where would you go?