Custom Decorative Dog Door Frame

Dog Door Makeover

dog-door-before-after

old-dog-doorWhen we bought our home we didn’t have a dog but there was already a dog door installed near the back door.

It was really small and leaked cold air into our home during the winter. So when we got our puppy that we knew would outgrow this little dog door, we did some research on dog doors.

I wanted a quality door that didn’t leak air, that was lockable and looked nice. There was only 1 dog door that fulfilled all my requirements and it wasn’t cheap. But the Freedom Pet Pass Insulated Dog Door was well worth the cost.

The site we purchased the dog door from recommends that the dog door be installed higher on the wall than our original door, so we had a lot of work to do!

We (and by “we” I mean my husband and my dad) removed the old door, installed the new one and patched up the giant hole that remained underneath the door. This was a massive 2 day project that left our entire downstairs in a coat of dust.

dog-door-installation

We now had an awesome dog door and a serious eye sore:

dog-door-with-no-frame

I headed to a local store that sells crown moulding and purchased some pieces to create a miniature mantle that would frame our new dog door.

molding

Unfortunately, the moulding doesn’t come all nice and put together like this, so I needed to find someone who was capable of mitering my mantle. Luckily, my step-uncle is an expert woodworker so we sent the wood off to his house to be cut & assembled.

When we got it back, my husband painted it to match the trim we already had and glued it in place. We love it!

dakota-dog-door-frame

blog-dog-door-frame-attractive

DIY Canvas Art – How to Paint a Silhouette Portrait

How to Paint a Silhouette onto a Canvas – No painting experience necessary!

diy-canvas-art-live-laugh-love-to-craft

I originally saw instructions for this project on The Space Between’s blog (via Pinterest). I loved how easy this looked because I’m not at all artistic and I’d never done a painting before. I’d been looking for some artwork for the empty wall space going up my staircase and I knew this would be perfect.

Here’s how I created a silhouette portrait of my dog:

Step 1: Take a side-view picture of your dog (or whatever/whoever you’d like to paint). Here is the picture of my dog Dakota that I used:

dakota-side-pic

Step 2: Buy a blank canvas. I chose a 10″ x 10″ canvas from Jo-Ann Fabric because it was the correct size for where I planned to hang the painting.

Step 3: Paint your canvas with the background color. I had leftover paint from when I painted the walls in our home so I used that. It was Behr Interior Paint & Primer in Eggshell finish. I also used the same type of roller I used to paint the walls – a regular 9″ paint roller with 3/8″ nap. I did one coat, let it dry and then painted a second coat.

While that’s drying, get your picture ready…

Step 4: Crop your picture to size. If you have Photoshop, crop your picture to the size of your canvas at a resolution of 300. I cropped my picture as 10″ by 10″ with a 300 pixels per inch resolution. (For more information on how to crop a picture, click Crop a Picture Using Paint or Crop a Picture Using Microsoft Word.)

crop-image

Step 5: Print your picture. Since my picture was wider than a standard piece of printer paper, I printed 2 different images that could be taped together (I also cut out the parts of the picture I didn’t need to save printer ink). Notice the first image has Dakota’s face, but not all of her body. The 2nd image has the remainder of her body, but cuts off her face.

print-pictures

Step 6: Using scissors, cut out the silhouettes and tape together.

Step 7: Position your picture on your canvas and lightly trace it with a pencil.

Step 8: Use a paint brush to paint the area inside your pencil line. Be sure your paint covers your pencil line so it doesn’t show. I did 1 coat, let it dry, then did a 2nd. It looked great! After that, I painted a 2nd piece – a silhouette of a frog – in the opposite color scheme.

easy-dog-frog-silhouette-painting

How to Make a Candy Dish – Easy DIY

How to Make Your Own Decorative Candy Dish Jar

candy-dish-how-to

candy-dish-before-after

I needed a gift for my boss but couldn’t find what I was looking for. I went into Target to browse for ideas and when I saw this purple candle holder (my boss is crazy about purple) sitting near this glass candlestick, it occurred to me that I could glue them together and then embellish it with some items from the craft store.

I headed to JoAnn Fabric in search of a Dragonfly charm (my boss loves dragonflies) and was happy to find something that was perfect. Next I was off to the ribbon aisle to find something to tie the look together, and found some burlap ribbon.

Keep your eyes open at stores like Target, Walmart or Hobby Lobby for items that will work for your home (or for a person you’d like to make a gift for). Another great source for craft items is the dollar store and also the thrift store. Once you find the perfect pieces for your project, head to the craft store to find the right embellishments.

Get creative with it! I think you could glue on some gems or rhinestones and create something really cool. One thing to note is that the burlap was best for this project because it made it easy to attach the charm and run it through the gaps in the burlap ribbon (see Step 5 below for clarification).

Here are the steps I followed to create a this decorative candy dish:

Craft Items:

Base piece

Top piece

Ribbon

Charm

Supplies:

Thread (similar in color to your ribbon)

Elastic cord (similar in color to your ribbon if possible)

Scissors

Glue (for ribbon & for glass)

Steps:

Step 1: Wrap ribbon around your candy holder 1 time, then fold back and tuck in (see picture):

wrap-ribbon

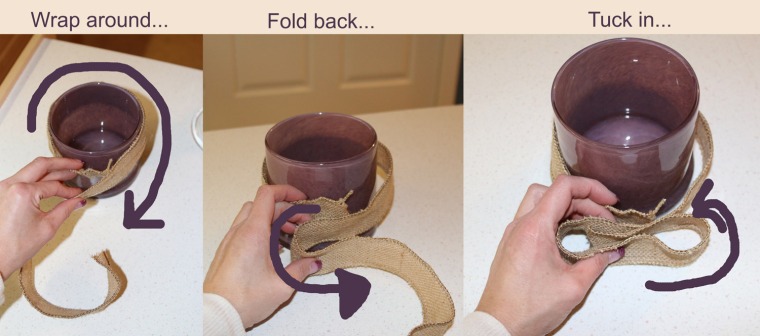
Step 2: Secure the ribbon. I used a strip of elastic that I had already but would recommend something that matches closely to your ribbon color. Simply tie it around your ribbon as tight as possible.

tie-ribbon

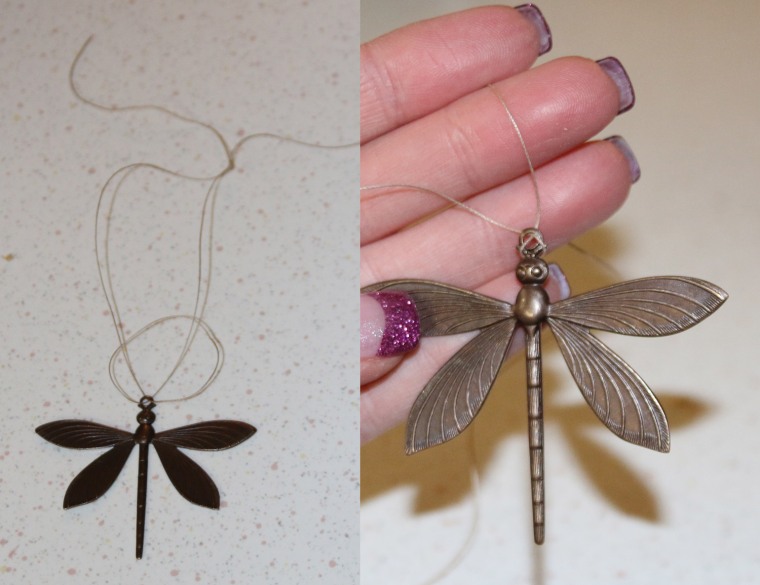
Step 3: Next you’re going to secure some thread to your charm. I cut the thread, folded in half and tied a knot where the ends met. Them I looped it through my dragonfly charm.

threaded-dragonfly

Step 4: Cut a small strip of ribbon long enough to wrap around the ribbon you tied onto the top of your dish. You can always trim it later so be sure you have plenty.

cut-burlap-strip

Step 5: Find a good spot in the middle of your ribbon strip and pull the tread that’s attached to your charm through.

pull-thread-through-ribbon

Step 6: With the charm facing outward, tie the thread snugly around the bow.

tie-thread-around-bow

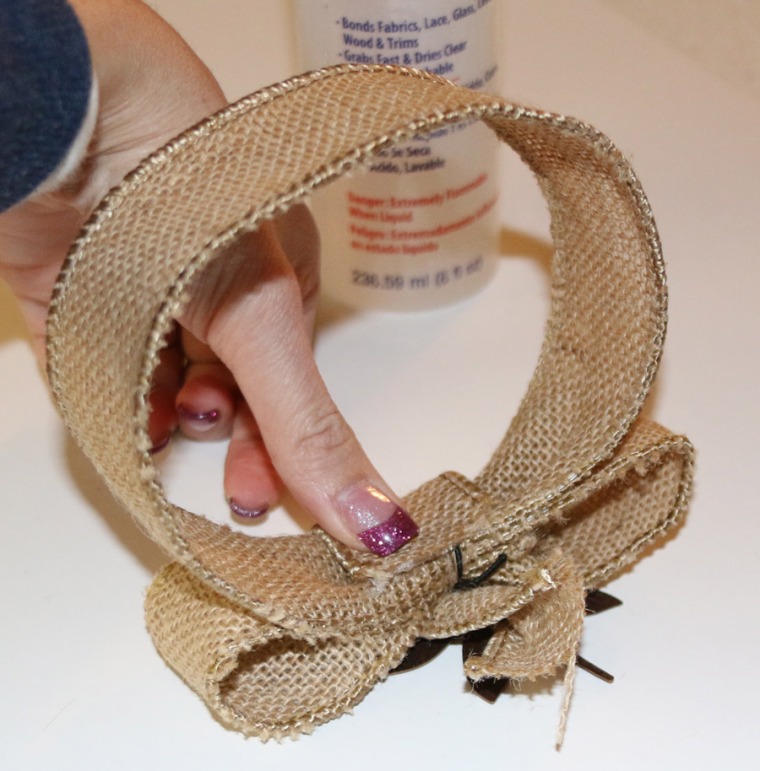
Step 7: Cut off excess ribbon and thread, leaving enough ribbon to wrap around bow.

cut-excess-ribbon

Step 8: Wrap ribbon securely around the bow and glue into place. I used Beacon Fabri-Tac permanent adhesive, but I’m sure any glue would do. I decided to twist my ribbon as I wrapped it around – play around with yours to determine what look you prefer.

glue-ribbon

Step 9: Glue your base and top pieces together. I wasn’t sure what type of glue to use for glass so I google’d Aleene’s original tacky glue (since I had some) and it said it worked for glass.

glue-base

Step 10: Put the ribbon on the top piece and add candy. I lucked out and found Dove chocolates with purple wrappers which matched perfectly.

add-candy